Projects
How to Build a Music Production Studio Desk/Workstation
Aug
Chances are if you’ve found this post you are in the same boat that I was in. That is, you need a special type of desk for music production that has 19″ rack space for all of your rack-mounted audio gear, but you don’t want to spend $2k or more to buy one. Look, I’m not trying to discount the value of a beautifully manufacturered desk. A desk is an invaluable investment and you can get a high quality one for that amount of money. However, like me, you’re thinking of all that other gear you’d rather acquire with that two grand. …or you’ve got kids to feed. You’re also probably thinking, “how hard could it be to build a desk?” Truth is, not that hard. All you need is about $300, a few tools, and some basic wood working skills.
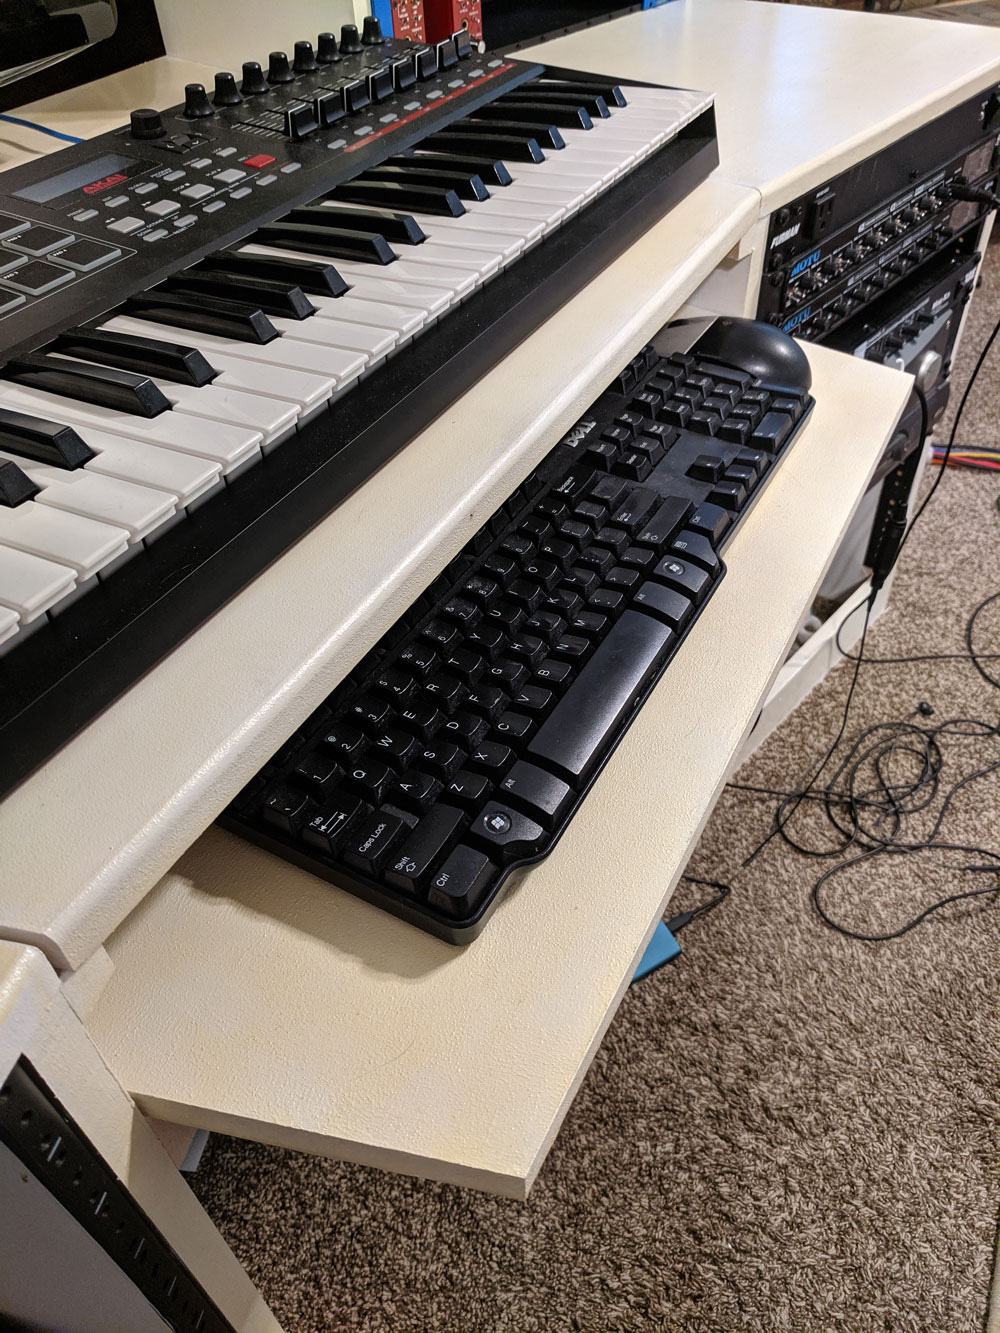
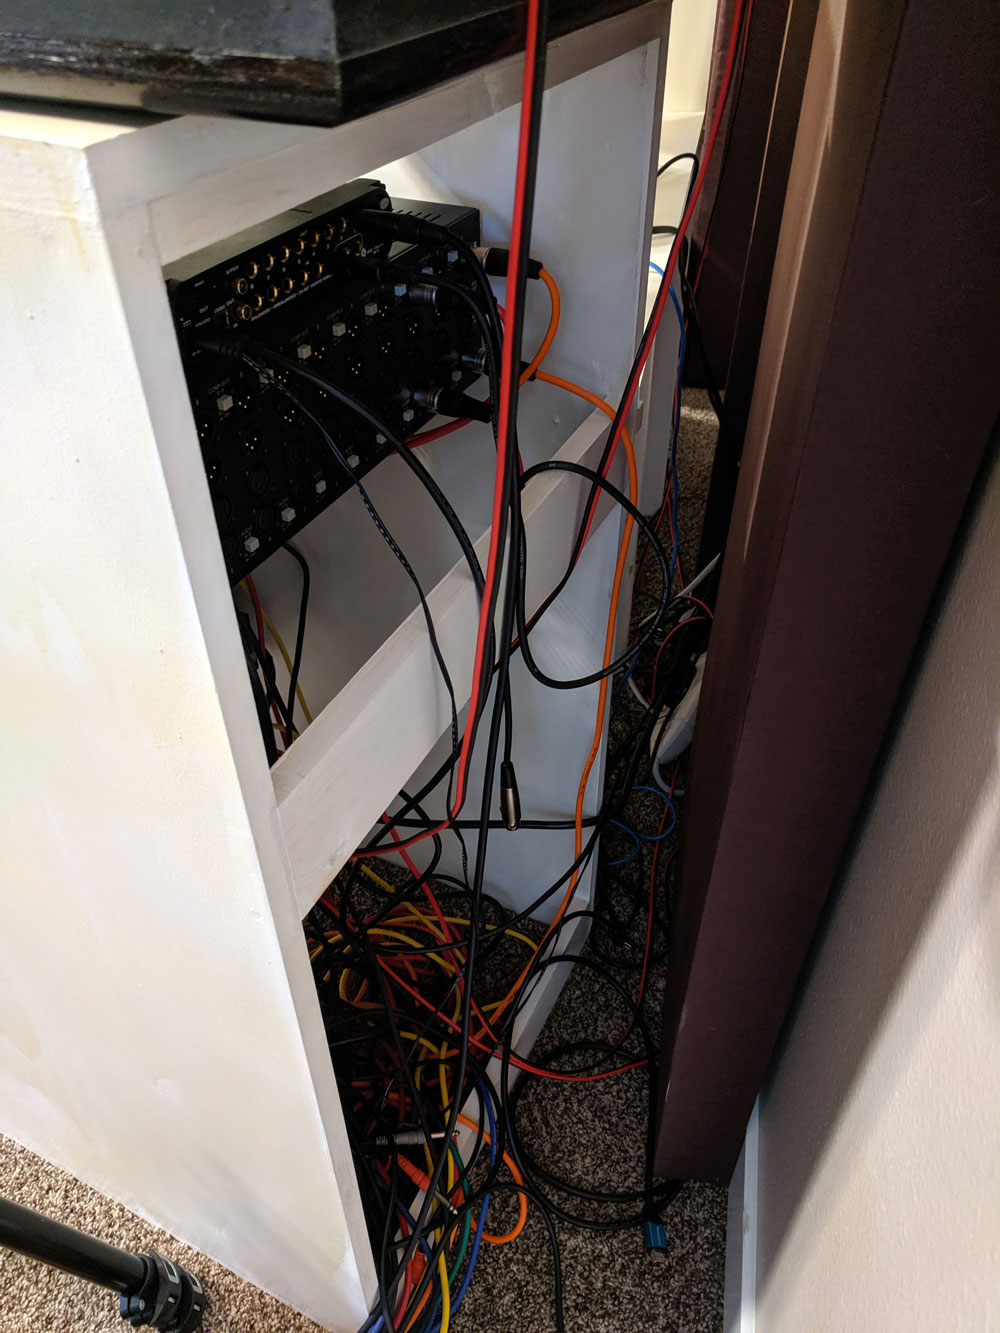
Below are my plans and instructions for the music workstation desk that I built. It features 40 units of rack space for all your toys, ample desktop space for your keyboard and other outboard gear, ear-level shelves for your monitor speakers, and a shelf for your computer keyboard and mouse. I did my best to provide adequate instructions to help you along. My instructions will not go into how to use a trim bit on a router, for example, so you’ll need to have some skills with using the tools below to get the job done properly.. At the very least, I’ve saved you the time and effort of planning the measurements and sourcing the materials.
Materials Needed (Cost: ~$300)
- 2 – Reliable Hardware Company 14-Unit Rack Rails (RH-14-SRR-A)
- 2 – Gator Rackworks 6-Unit Rack Rails (GRW-RACKRAIL-06U)
- 4 – 1″x4″x4′ Whitewood Board (Actual: 0.75-in x 3.5-in x 4-ft)
- 3 – 4’x8′ 3/4″ MDF Sheets (Alternative: Finished Plywood)
- Parts Express #6 x 3/4″ Deep Thread Pan Head Screws
- 1-5/8″ Wood Screws
- Wood Glue
- Wood Filler
Important Note: The measurements within this plan were calculated based on the above materials specifically. Any modifications to the source list may require modifications to the plan’s measurements or the materials themselves. I used MDF for the desk because it’s easy to cut, finish, and it costs less. The downside is that it creates a lot of fine dusk that’s horrible for your lungs (wear a mask or respirator!) and it’s really heavy. As an alternative, you can use finished plywood if you’d like to use stain, but be prepared to spend more.
Tools Needed
- Drill with Bit Set
- Circular Saw
- Router with Trim Bit
- Circular Saw Fence with Clamps
- Four 24in (or longer) Bar Clamps
- Hand Saw
- Angle Finder
- Measuring Tape
- Pencil
- Dust Mask or Respirator
- Safety Glasses
- Workbench or Saw Horses
- Scroll Saw (optional)
- Miter Saw (optional)
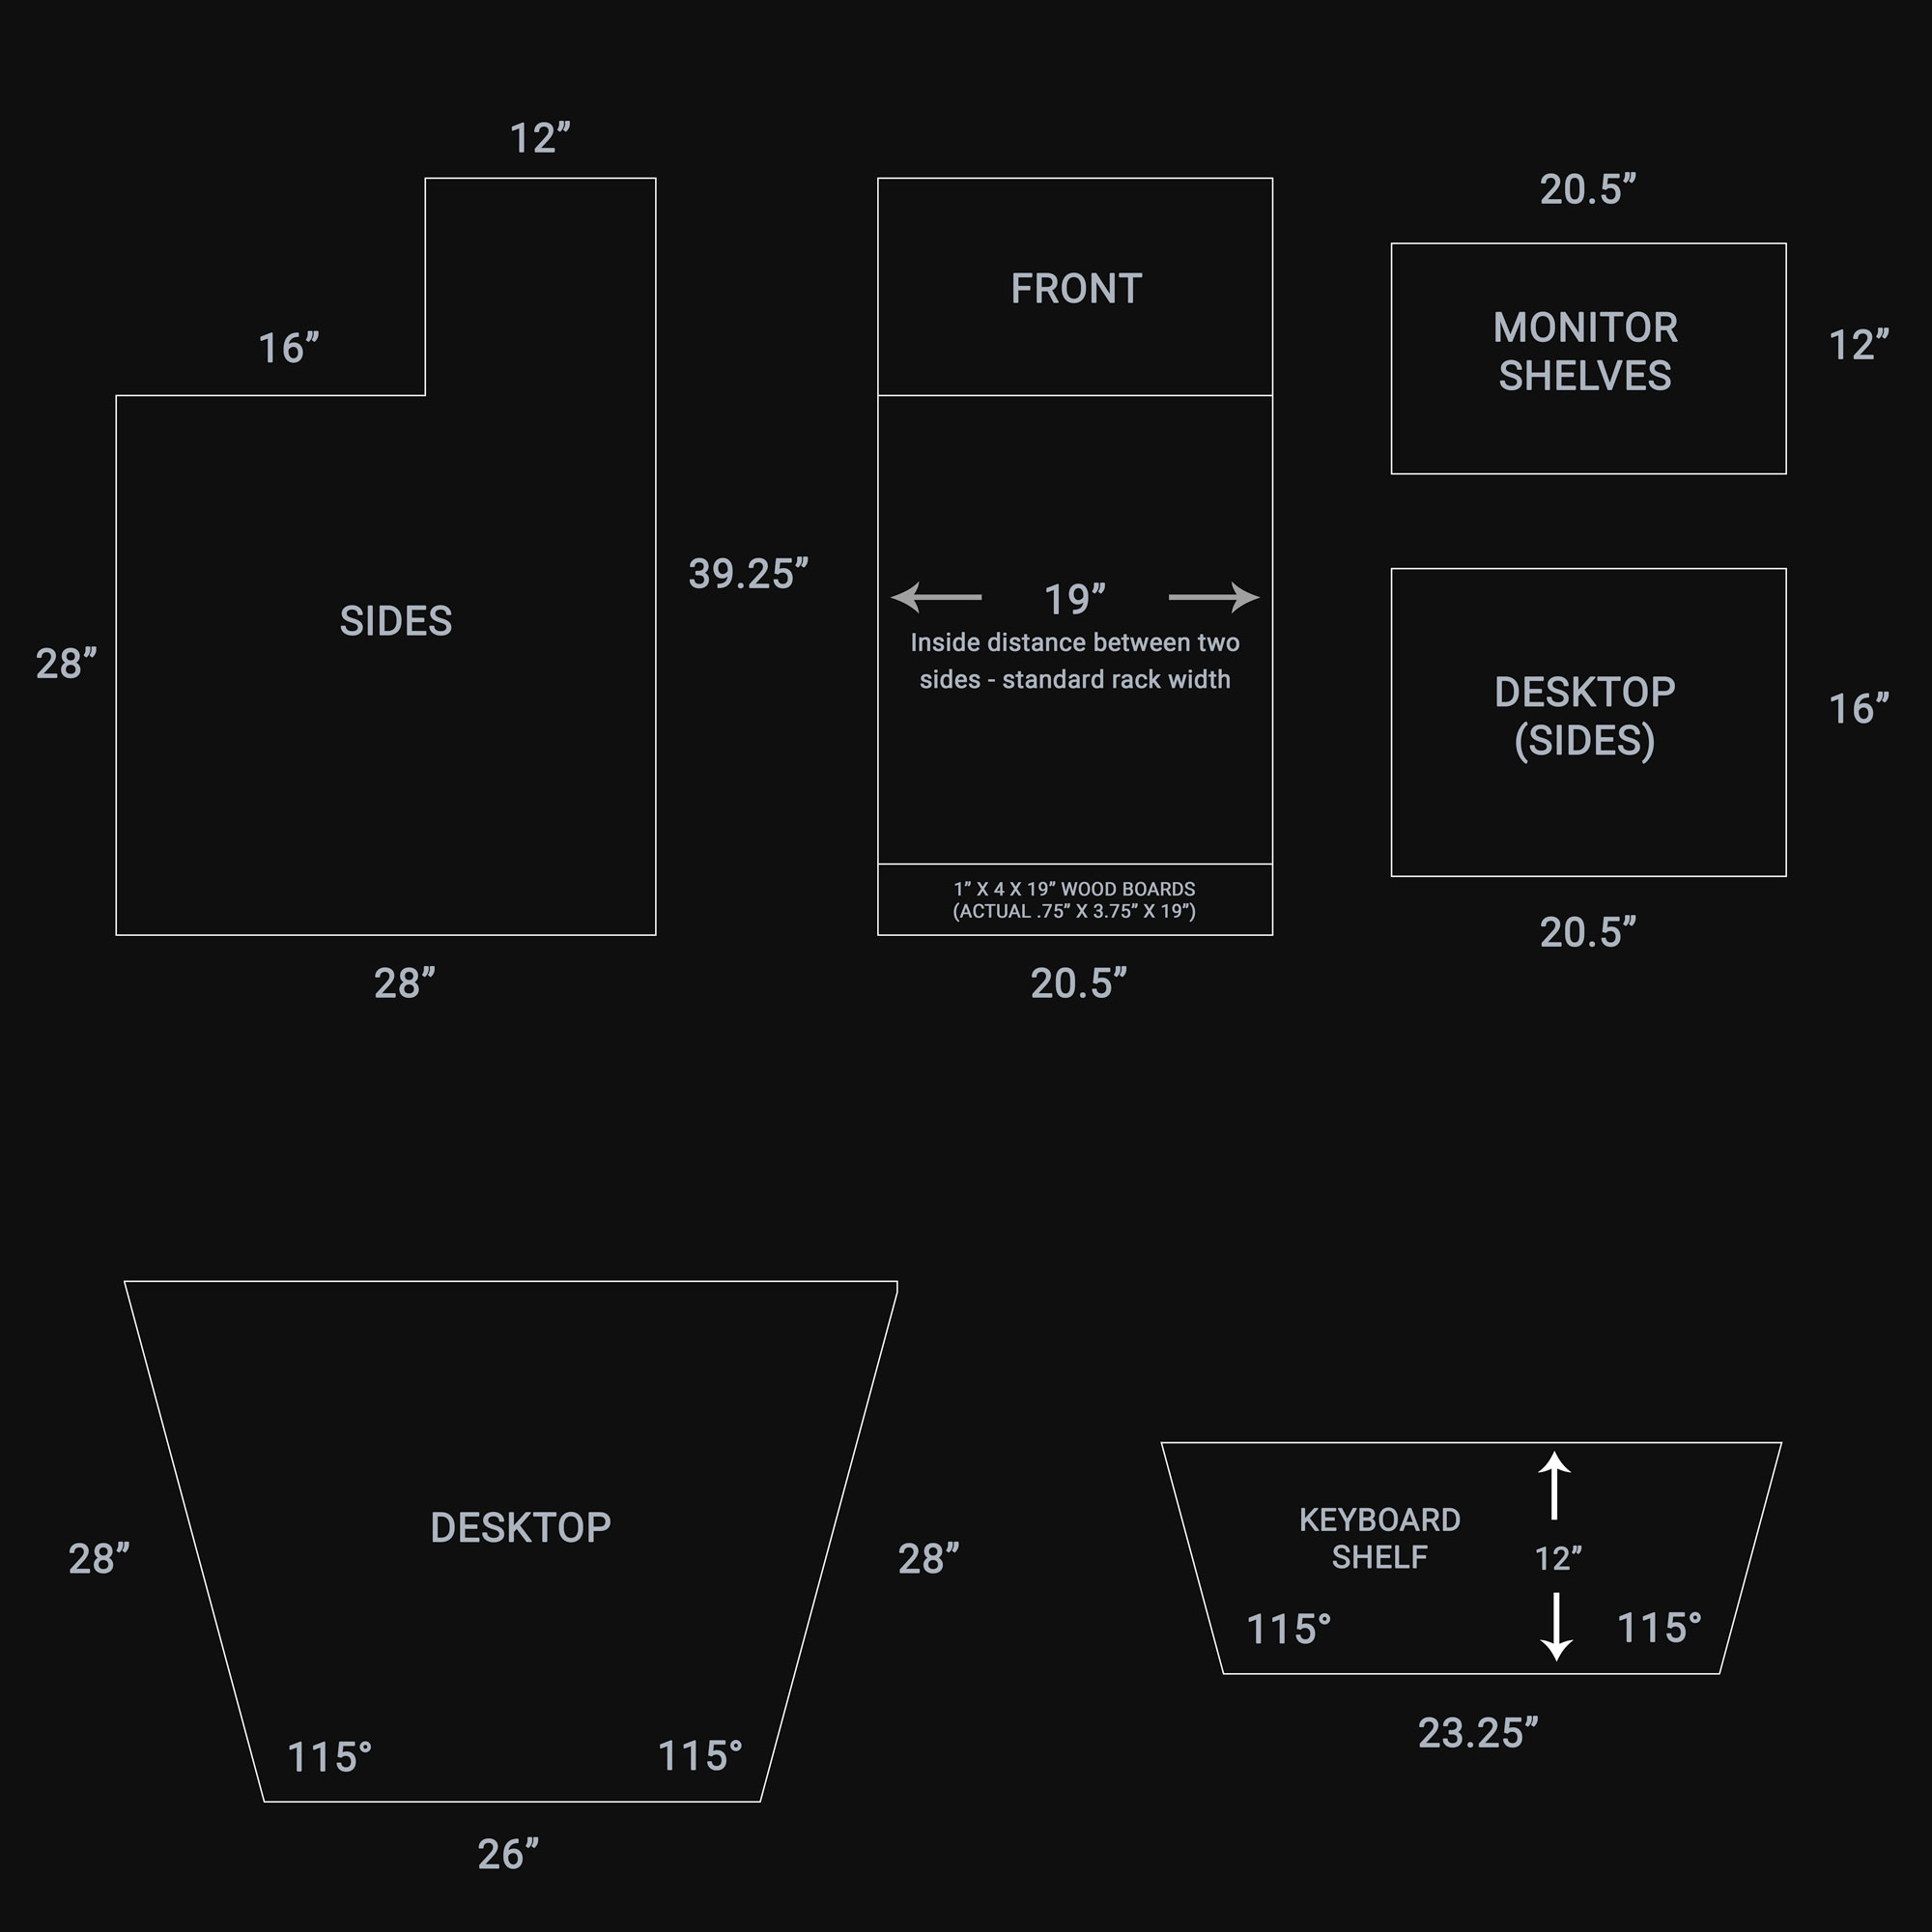
Measurement Diagram
Below are the measurements for the desk. Cut each piece to these specifications, and you’ll have no problem getting everything to fit.
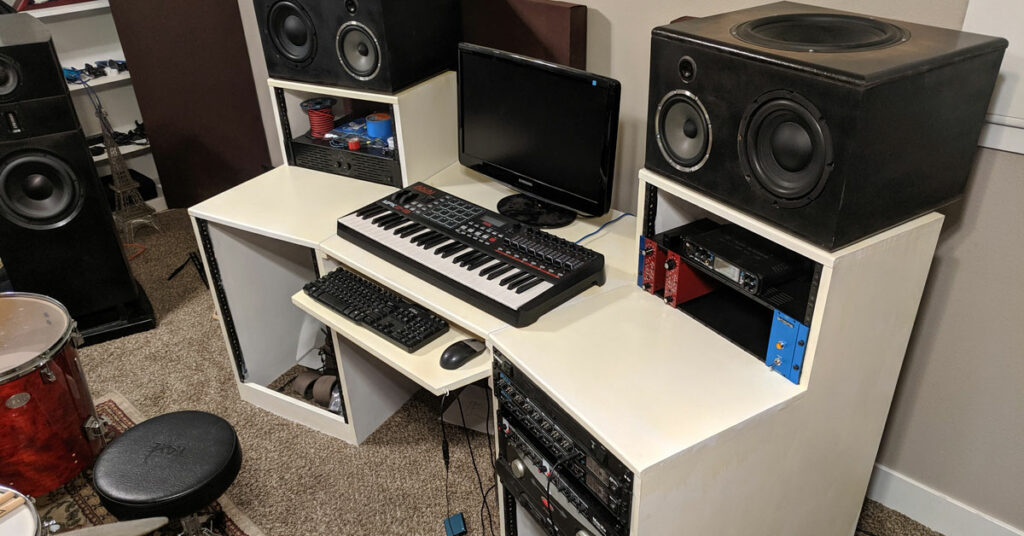
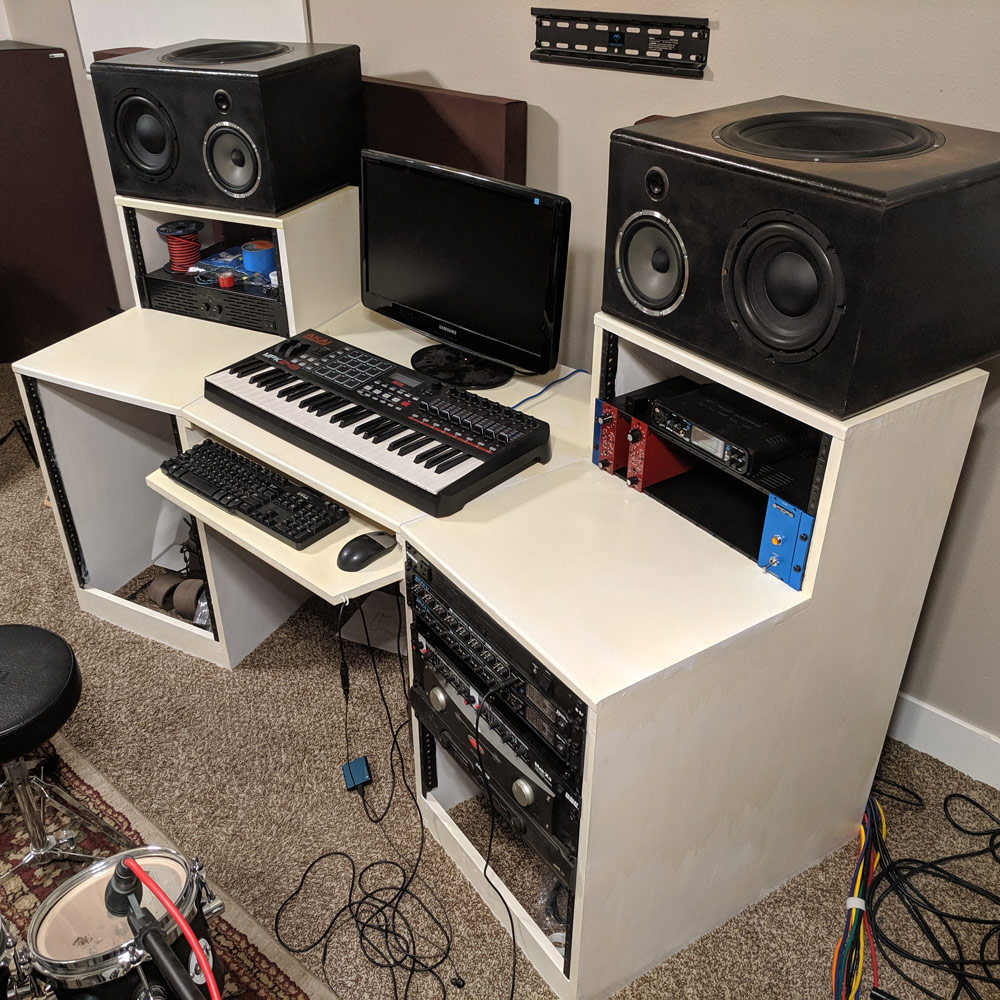
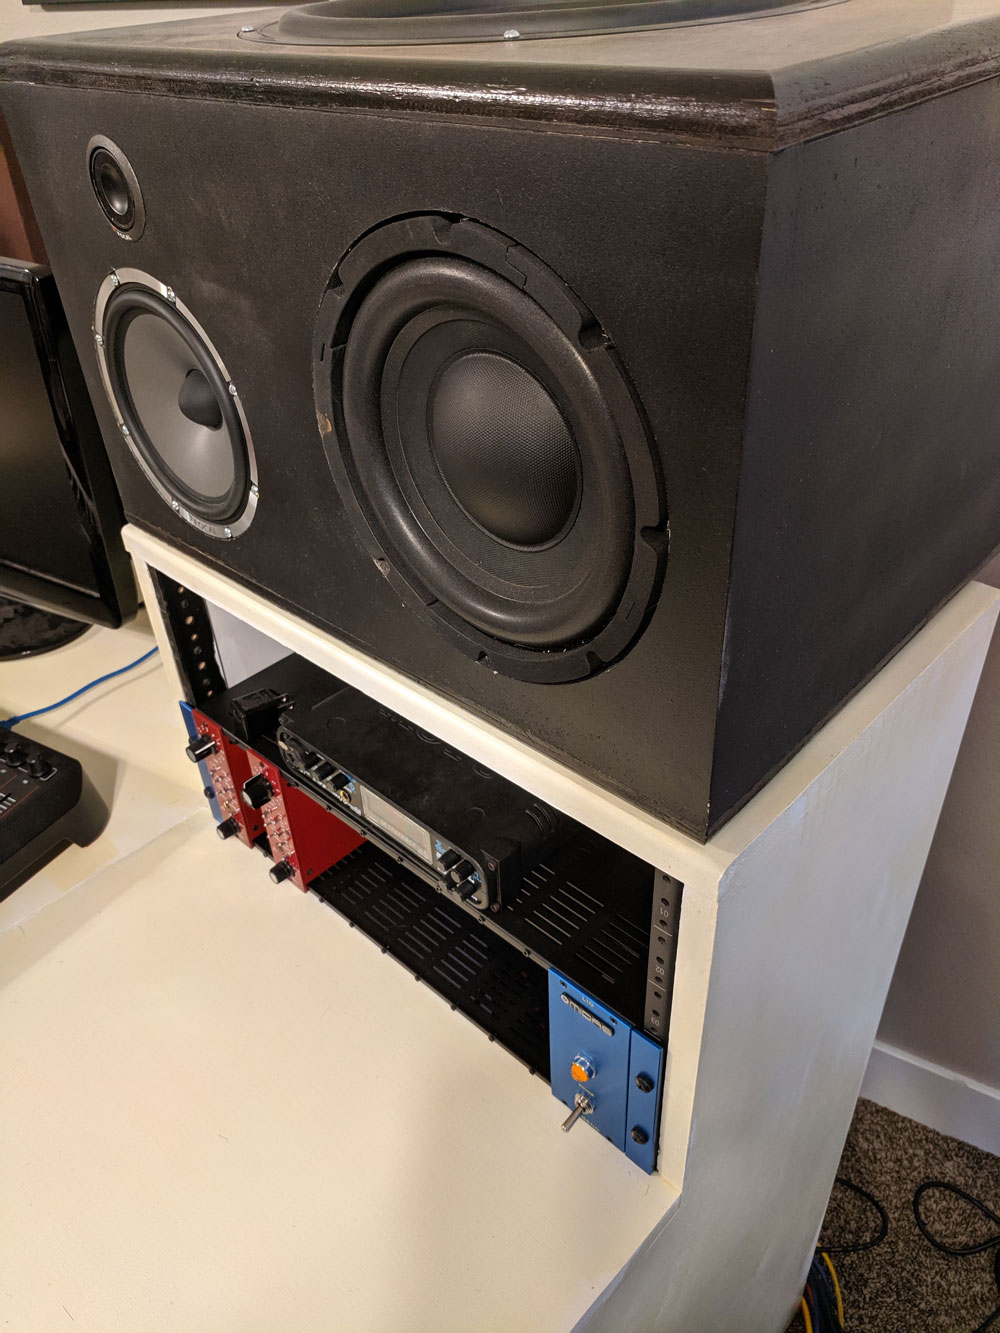
Finished Desk
Below is a picture of the finished studio desk. I’m really happy with the build quality and it is serving its purpose well. I could have done a better job with the finish (both sanding and painting), but I was in the middle of a music project and rushed it. Also, the polyurethane I used turned yellow over the white paint. I’ll probably paint it another color at some point, but for now it’s in use.

Instructions
Below are the instructions for cutting the wood pieces and putting them all together. I’ll try to provide tips along the way.
Cut The Side Template
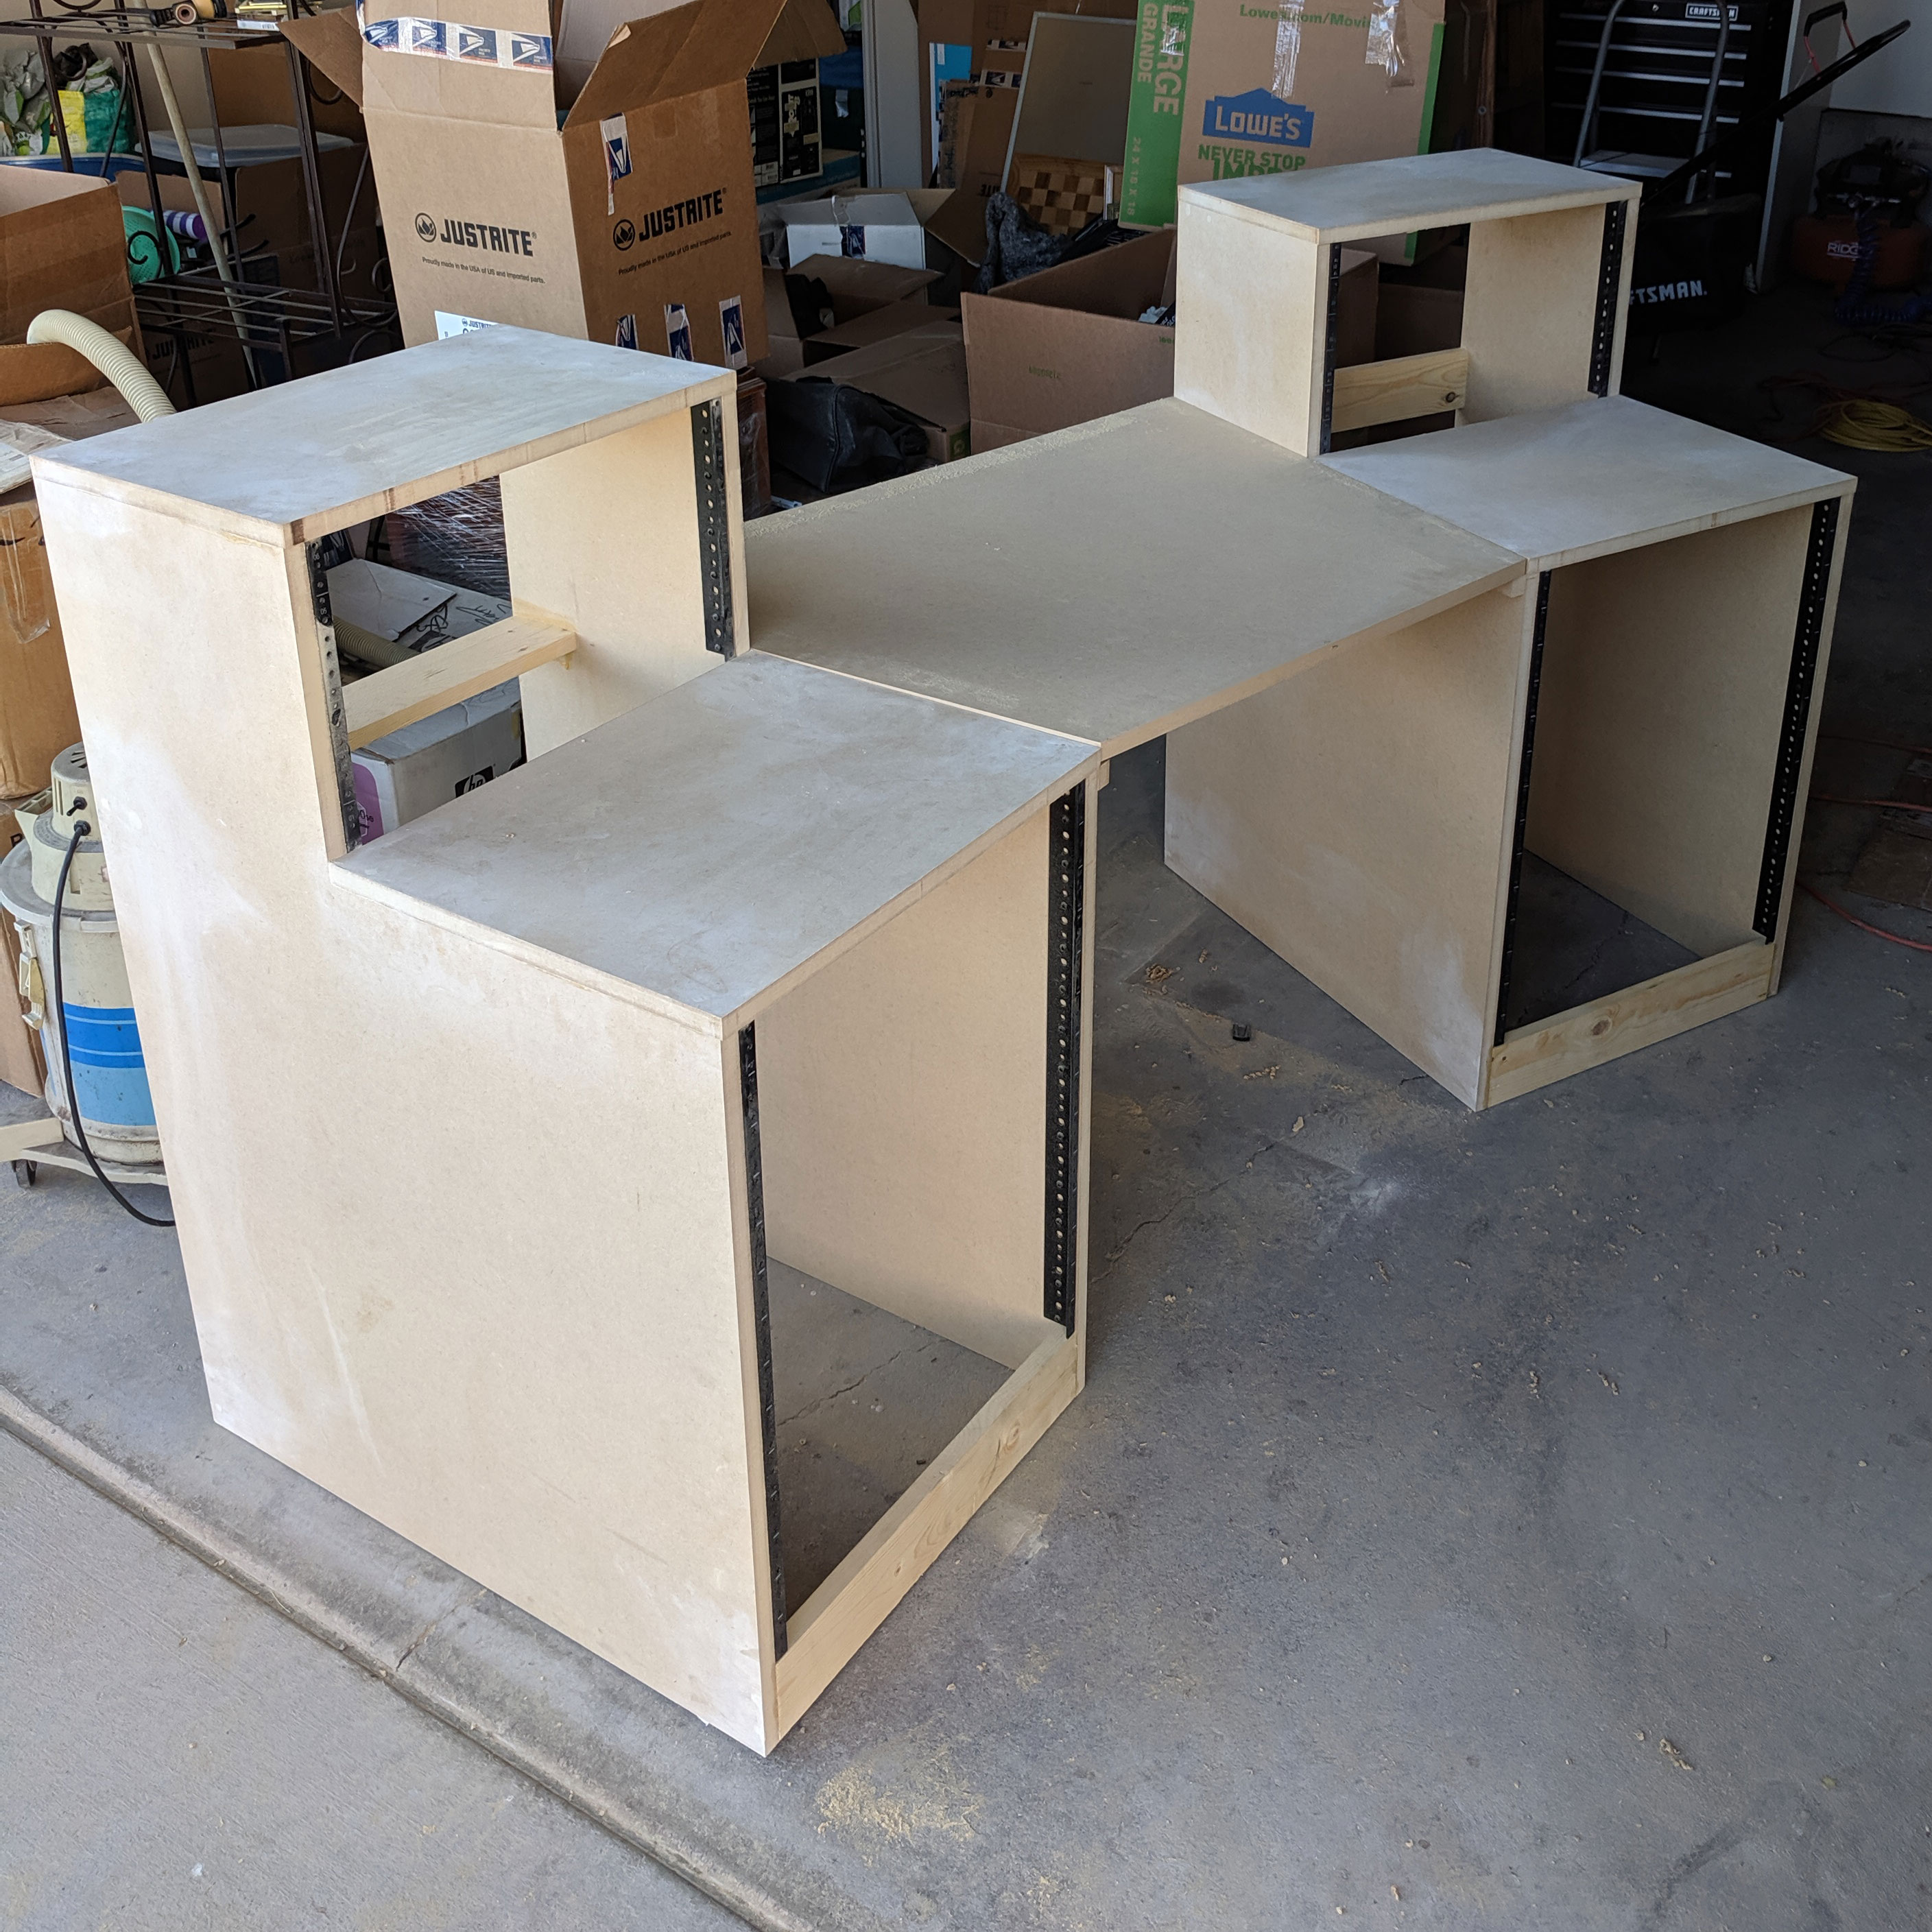
Before you cut the first side (which you’ll use as the template for the others), you may want to cut the 4’x’8 MDF sheets in half. Working with the full sheet is difficult because of the size and weight. Have someone help you to position and hold the sheets while you cut them. The resulting 4’x4′ sheets can now be managed by one person.
Using a tape measure, pencil, and straight edge, lay the dimensions out on the side template according to the dimensions diagram above. I recommend starting each measurement off the manufactured side (meaning the edge the manufacturer cut, not you). The manufacturered edge has a better chance of being square. This goes for all cuts you’ll make during this project.
Use the circular saw and fence to cut the side template out. I recommend cutting off the excess waste as you cut it out to reduce size, weight, and stress on the template as you make more cuts. When you come to the meeting point where the desktop edge meets the monitor shelf edge, you’ll need to stop cutting with the circular saw about a 1/4″ from the meeting point because the circular saw will not make a clean/straight cut there. You’ll need to finish that off with a scroll saw or hand saw.
Cut The Other Sides Using the Template
Now that you have the side template, you can use it to make 3 identical copies. Because you’re cutting out everything by hand, it’s almost impossible to make an identical copy by cutting it the same way as the template. Therefore, I recommend using a router and trim bit.
Cut out the other sides using the same method as the template, HOWEVER, leave at least a 1/4″ of extra wood on there. Once that’s cut, place this slightly oversized piece onto the side template and make sure to leave a little bit of wood overhanging the template. Clamp the oversized piece to the template. You can now use the router with the trim bit to trim the oversized piece to the exact dimensions of the template. Repeat this step for the other 2 sides.
Install the Rack Rails
Line each rack rail up with the edge of the side pieces. Make sure each rack rail is positioned in the correct way for the side you plan on attaching it to (whether it’s the inside or outside piece). You can use a ruler or something else straight to ensure the rails are square with the side pieces, and you’ll absolutely need them to be square for your audio gear to fit properly. Clamp the rails onto the sides and use the deep pan head screws and a drill to attach them the sides. I recommend using deep thread pan screws over standard wood screws becuase the oversized threads really grip into the wood and provide strength for something that will be carrying a lot of weight.
Cut Eight 19″ Support Pieces
The 19″ boards you’ll make from the 1″x4″x4′ will be the main supports for the desk and will ensure the required width between the sides for your audio gear. You’ll make 4 per side of the desk. This is a real simple step. Simply cut the boards to 19″ with a circular saw or, better yet, a miter saw. A miter saw will help you get it perfectly square for a nice fit. Cut each piece exactly to 19″ to ensure your audio gear will fit properly.
Join the Sides Together
Using the 19″ boards you cut and some long bar clamps, you can now join the the sides together with wood glue and wood screws. Again, I like using course thread drywall screws because they grip the wood really well. Using the clamps, dry fit everything together. Once everything is lined up, you can remove one support piece at a time and glue/screw it inplace. For a clean finish, I recommend counter-sinking the screw head. Also, MAKE SURE to drill pilot holes for the screws to prevent wood splitting and to make the job easier. Do this for every screw you drive. MDF is much more prone to splitting than plywood.
Cut the Desktop and Monitor Speaker Shelves
Cut these to the dimensions above. It’s really hard to get these perfectly square so what I ended up doing was cutting them a little oversized, placing them in their final place, and then using the trim bit, trimmed them flush. Keep in mind, you will not have enough room for the router in the area where the desktop meets the vertical edge of the monitor shelf. Therefore, you’ll have to get the desktop dimensions as close as possible and any excess can be sanded off. It’s much better to have extra material than not enough, because wood filler is not fun. For the places where the trim bit had nowhere to guide itself (like the front sections where the audio gear goes), I clamped the circular saw fence there and ran the trim bit along the fence. This created a small 1/8″ lip on those parts, but I thought it created a little nice accent, and it doesn’t look out of place at all. Attach the tops using wood glue and wood screws.
Cut the Main Desktop and Keyboard Shelf
This step is the trickiest, because it requires you to cut angles. However, with a couple special tools you can get it done. Take one of the 4’x4′ MDF sheets and find and mark the midpoint on one of the manufacture-cut sides. From the midpoint measure 13″ in each direction along the side and make a mark. This will be your 26″ desktop front while leaving enough room for you to cut the 28″ angled sides. Take your circular saw fence and use a piece of tape (or other marker) to notate the length of 28″ along the fence. Now, set the angle finder at 115° and line one of it’s arms with the desktop front. Take your fence and line it up with the other angle finder arm and leave a mark on the MDF sheet 28″ out from it (using the tape marker you left on the fence). Repeat for the other side. Once you have everything marked, cut it out with the circular saw. Since you have all the measurements you need, the length of the back side and depth are irrelevant.
The same technique can be used for the keyboard shelf. You can make the keyboard depth as long as you want, but I opted for 12″. This made the front length of the shelf 23-1/4″. I didn’t plan these dimensions ahead of time. This is just what they ended up being when I made the shelf on the fly.
Cut the Support Pieces for the Main Desktop and Keyboard Shelf
For the main desktop support pieces, I cut two 28″ long, 1″ wide strips of MDF and then screwed them to the inside sections of the desk. Each support is exactly 3/4″ from the top of the side desktops to line the main desktop up perfectly with the side section desktops. The same technique can be used for the keyboard shelf support pieces. I mounted those 4″ down from the desktop to accomidate the keyboard and make room for hands. I didn’t glue or screw the main desktop or keyboard shelf to the sides so I could easily transport the desk as needed. This also isn’t needed. These two pieces will lay in place without the need to secure them.
Fill Screw Holes, Sand, and Finish
Generously fill and pack each countersunk screw hole with wood filler. Once dry, sand the excess wood filler down until you have a smooth finish. A palm sander really comes in handy here. Sand the other parts of the desk to ensure a smooth finish all around. Finish using your choice of paint, stain, and top-coat.